Cenots5.8 搭建openvpn
openvpn是什么东西,大家网上一搜就能有很详细的解释了这里就不废话了。
我们在做部署方案之前要根据自己的需求选择简单高效的解决方案。我简单说一下我上家公司有几百台服务器,在天津,北京,山西等很多地区都有机房,当然也有云主机,这个登录策略有些复杂,这里就有云主机的登录策略举例。
我们首先在云主机上面选择了两台云主机作为主备跳板机,所有的云主机开启iptables,只允许跳板机内网普通用户登录,而跳板机只允许我们的办公网络的出口ip远程登录。
那么问题就来了,万一周末或者技术人员在家,需要远程解决问题的时候,由于做了上面的限制,没办法远程解决问题了。这个方案可能适合我们公司,并不适合其他公司,思想最重要。
我们公司在自己的办公区域有自建的机房,这时候我们选出了两台服务器作为主备vpn服务器,整个办公网用几十台千兆交换机用vlan打通了。
那么以后再出现问题,技术人员就可以通过openvpn跳到公司内网,然后就可以去控制自己要控制的内网机器了。如果想跳转云主机呢,我们云主机上面并没有做openvpn,可以通过ssh工具跳到我们规划好的办公网服务器上面然后再跳转到云主机的跳板机上面(空置服务器挺多的硬件条件比较宽松)。
可能有些人觉得这个方案尤其是远程跳云主机的方案太麻烦了,我觉得有时候想确保安全,就要麻烦一点。而且这只是一个保险方案,哪有一到周末就出问题的时候,基本工作日问题都摆平了。我工作这么久,开发人员周末在家远程解决问题的情况很少。
重点是openvpn的搭建(做事有点谨慎,所以这里的公网IP还是修改过的,但是步骤都是真实操作的),方案就简单说一下了哈,下面步入正题写一下openvpn的搭建
======================Centos 5.8 64位搭建openvpn===========================================
一、环境介绍:
openvpn server端:
操作系统:
[root@localhost openvpn]# cat /etc/redhat-release
CentOS release 5.8 (Final)
IP地址:
[root@localhost openvpn]# ifconfig |grep “inet addr”
inet addr:10.1.15.105 Bcast:10.1.15.255 Mask:255.255.255.0
inet addr:124.42.67.29 Bcast:124.42.67.31 Mask:255.255.255.248
inet addr:127.0.0.1 Mask:255.0.0.0
openvpn 客户端:
操作系统:Centos 6.4 64位
[root@iZ25awutocyZ openvpn]# ifconfig |grep “inet addr”
inet addr:10.251.2.68 Bcast:10.251.7.255 Mask:255.255.248.0
inet addr:123.56.122.70 Bcast:123.56.122.255 Mask:255.255.252.0
操作系统:Windows7 64位
IP地址:192.168.1.130
我在家的出口IP:221.216.137.113
二、 服务器端操作
1. 更新服务器时间并做定时同步
[root@localhost openvpn]# ntpdate pool.ntp.org #时间服务器我们是自己搭建的,但是由于演示我就搞了一个公共的时间服务器做时间同步。
5 Apr 16:14:47 ntpdate[4297]: step time server 202.112.31.197 offset 372.311756 sec
[root@localhost openvpn]# crontab -l|grep ntpdate
*/10 * * * * ntpdate pool.ntp.org >/dev/null 2>&1 #这个多少时间同步一次自己决定
2. 下载相关软件并安装
[root@localhost tools]# yum -y install openssl openssl-devel pam pam-devel gcc gcc-c++ #如果后面的安装过程再报少什么库,可自行将问题百度搜索yum上相应的库和工具就行。
[root@localhost openvpn]# mkdir /tools #创建一个目录只存要安装的软件和工具
[root@localhost openvpn]# cd /tools/
[root@localhost tools]# wget www.oberhumer.com/opensource/lzo/download/lzo-2.09.tar.gz
[root@localhost tools]# tar zxf lzo-2.09.tar.gz #安装lzo压缩模块可以使我们在openvpn在数据传输的时候尽量的减少带宽的消耗。
[root@localhost tools]# cd lzo-2.09
[root@localhost lzo-2.09]# ./configure --prefix=/usr/local/lzo-2.09
[root@localhost lzo-2.09]# make && make install
[root@localhost lzo-2.09]# cd ..
wget http://swupdate.openvpn.org/community/releases/openvpn-2.0.9.tar.gz
[root@localhost tools]# tar zxf openvpn-2.0.9
[root@localhost tools]# cd openvpn-2.0.9
[root@localhost openvpn-2.0.9]# ./configure --prefix=/usr/local/openvpn-2.0.9 \
--with-lzo-headers=/usr/local/lzo-2.09/include/ \
--with-lzo-lib=/usr/local/lzo-2.09/lib \
--with-ssl-headers=/usr/include/openssl/ \
--with-ssl-lib=/usr/lib/openssl /
[root@localhost openvpn-2.0.9]# make && make install
[root@localhost tools]# cd /tools/
wget http://swupdate.openvpn.org/community/releases/easy-rsa-2.2.0_master.tar.gz
[root@localhost tools]# tar zxf easy-rsa-2.2.0_master.tar.gz
下面一步选作:
[root@localhost tools]# tail -n 2 /etc/profile
PATH=$PATH:/usr/local/openvpn-2.0.9/sbin #将openvpn的命令添加环境变量
export PATH
[root@localhost tools]# openvpn --version #上面那样做的目录就是不用全路径使用命令了
OpenVPN 2.0.9 x86_64-unknown-linux [SSL] [LZO] [EPOLL] built on Apr 5 2015
Developed by James Yonan
Copyright (C) 2002-2005 OpenVPN Solutions LLC <info@openvpn.net>
3. 建立的CA证书
[root@localhost tools]# mkdir -p /etc/openvpn
[root@localhost openvpn]# cp -rf /tools/easy-rsa-2.2.0_master/easy-rsa /etc/openvpn/
[root@localhost tools]# cd /etc/openvpn
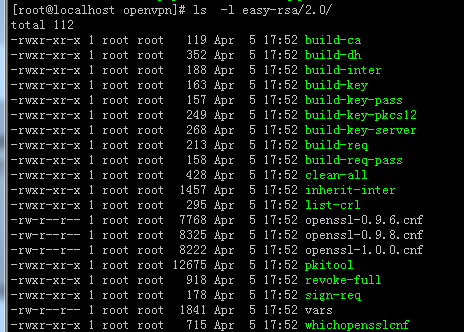
下面对我们用到的文件进行一下介绍:
vars 脚本,是用来创建环境变量,设置所需要的变量的脚本
clean-all 脚本,是创建生成CA证书及密钥 文件所需要的文件和目录
build-ca 脚本,生成CA证书(交互)
build-dh 脚本,生产交换秘钥协议文件(交互)
build-key-server 脚本,生成服务器端密钥(交互)
build-key 脚本,生成客户端密钥(交互)
pkitool 脚本,直接使用vars的环境变量设置直接生成证书(非交互)
[root@localhost openvpn]# vi easy-rsa/2.0/vars #进行下修改等会创建证书的时候默认回车就行
export KEY_COUNTRY=”CN”
export KEY_PROVINCE=”BJ”
export KEY_CITY=”beijing”
export KEY_ORG=”51niux”
export KEY_EMAIL=”csp@51niux.com”
其实是11行,但是有些是重复的所以修改之后就是5行了,下面是9行的全部定义:
export KEY_COUNTRY=”CN” #所在国家
export KEY_PROVINCE=”BJ” #所在省份
export KEY_CITY=”beijing” #所在城市
export KEY_ORG=”51niux” #所在组织
export KEY_EMAIL=”csp@51niux.com” #邮箱
export KEY_EMAIL=csp@51niux.com #邮箱
export KEY_CN=51niux #查了好多博客有篇说是邮箱.com和@中间的部分
export KEY_NAME=51niux #查了好多博客有篇说是邮箱.com和@中间的部分
export KEY_OU=51niux #单位名称
export PKCS11_MODULE_PATH=51niux #单位名称
export PKCS11_PIN=123456 #个人密码
[root@localhost openvpn]# cd easy-rsa/2.0/
[root@localhost 2.0]# . ./vars
NOTE: If you run ./clean-all, I will be doing a rm -rf on /etc/openvpn/easy-rsa/2.0/keys
[root@localhost 2.0]# ./clean-all
[root@localhost 2.0]# ./build-ca #一路回车就行
Generating a 1024 bit RSA private key
………………++++++
……….++++++
writing new private key to ‘ca.key’
—–
You are about to be asked to enter information that will be incorporated
into your certificate request.
What you are about to enter is what is called a Distinguished Name or a DN.
There are quite a few fields but you can leave some blank
For some fields there will be a default value,
If you enter ‘.’, the field will be left blank.
—–
Country Name (2 letter code) [CN]:
State or Province Name (full name) [BJ]:
Locality Name (eg, city) [beijing]:
Organization Name (eg, company) [51niux]:
Organizational Unit Name (eg, section) [changeme]:
Common Name (eg, your name or your server’s hostname) [changeme]:
Name [changeme]:
Email Address [csp@51niux.com]:
[root@localhost 2.0]# ./build-key-server openvpn.51niux.com #自定义名称创建服务端的秘钥证书
Generating a 1024 bit RSA private key
……………….++++++
…………………………………….++++++
writing new private key to ‘openvpn.51niux.com.key’
—–
You are about to be asked to enter information that will be incorporated
into your certificate request.
What you are about to enter is what is called a Distinguished Name or a DN.
There are quite a few fields but you can leave some blank
For some fields there will be a default value,
If you enter ‘.’, the field will be left blank.
—–
Country Name (2 letter code) [CN]:
State or Province Name (full name) [BJ]:
Locality Name (eg, city) [beijing]:
Organization Name (eg, company) [51niux]:
Organizational Unit Name (eg, section) [changeme]:
Common Name (eg, your name or your server’s hostname) [openvpn.51niux.com]:
Name [changeme]:
Email Address [csp@51niux.com]:
Please enter the following ‘extra’ attributes
to be sent with your certificate request
A challenge password []:
An optional company name []:
Using configuration from /etc/openvpn/easy-rsa/2.0/openssl-0.9.8.cnf
Check that the request matches the signature
Signature ok
The Subject’s Distinguished Name is as follows
countryName :PRINTABLE:’CN’
stateOrProvinceName :PRINTABLE:’BJ’
localityName :PRINTABLE:’beijing’
organizationName :PRINTABLE:’51niux’
organizationalUnitName:PRINTABLE:’changeme’
commonName :PRINTABLE:’openvpn.51niux.com’
name :PRINTABLE:’changeme’
emailAddress :IA5STRING:’csp@51niux.com’
Certificate is to be certified until Apr 2 10:38:23 2025 GMT (3650 days)
Sign the certificate? [y/n]:y
1 out of 1 certificate requests certified, commit? [y/n]y
Write out database with 1 new entries
Data Base Updated
[root@localhost 2.0]# ./build-key csp #生成客户端所需的秘钥文件,最好以醒目的名称命名
Generating a 1024 bit RSA private key
…..++++++
………………….++++++
writing new private key to ‘csp.key’
—–
You are about to be asked to enter information that will be incorporated
into your certificate request.
What you are about to enter is what is called a Distinguished Name or a DN.
There are quite a few fields but you can leave some blank
For some fields there will be a default value,
If you enter ‘.’, the field will be left blank.
—–
Country Name (2 letter code) [CN]:
State or Province Name (full name) [BJ]:
Locality Name (eg, city) [beijing]:
Organization Name (eg, company) [51niux]:
Organizational Unit Name (eg, section) [changeme]:
Common Name (eg, your name or your server’s hostname) [csp]:
Name [changeme]:
Email Address [csp@51niux.com]:
Please enter the following ‘extra’ attributes
to be sent with your certificate request
A challenge password []: #密码为空,在客户端连接时候不用密码,当然也可以设置
An optional company name []:
Using configuration from /etc/openvpn/easy-rsa/2.0/openssl-0.9.8.cnf
Check that the request matches the signature
Signature ok
The Subject’s Distinguished Name is as follows
countryName :PRINTABLE:’CN’
stateOrProvinceName :PRINTABLE:’BJ’
localityName :PRINTABLE:’beijing’
organizationName :PRINTABLE:’51niux’
organizationalUnitName:PRINTABLE:’changeme’
commonName :PRINTABLE:’csp’
name :PRINTABLE:’changeme’
emailAddress :IA5STRING:’csp@51niux.com’
Certificate is to be certified until Apr 2 10:41:13 2025 GMT (3650 days)
Sign the certificate? [y/n]:y
1 out of 1 certificate requests certified, commit? [y/n]y
Write out database with 1 new entries
Data Base Updated
[root@localhost 2.0]# ./build-dh #生成交换秘钥协议文件
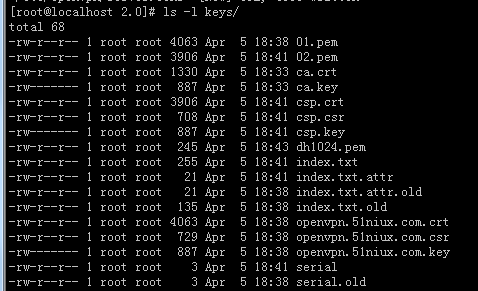
[root@localhost 2.0]# cp -rf keys /etc/openvpn
[root@localhost 2.0]# vi /etc/openvpn/server.conf
local 124.42.67.29 #监听ip
port 52116 #监听端口
proto tcp #默认使用的网络协议跟客户端一致
dev tun #普遍选择tun隧道模式,当然还有tap桥接模式
ca /etc/openvpn/keys/ca.crt #ca证书位置
cert /etc/openvpn/keys/openvpn.51niux.com.crt
key /etc/openvpn/keys/openvpn.51niux.com.key
dh /etc/openvpn/keys/dh1024.pem
server 10.16.0.0 255.255.255.0 #分配一个vpn网段但是不能跟openvpn服务端的内网重复
ifconfig-pool-persist ipp.txt #维持一个客户端和virtual IP的对应表,以方便客户端重新,连接可以获得同样的IP
keepalive 10 120 #设置服务端检测的间隔和超时时间
comp-lzo #开启压缩功能
persist-key #通过keepalive检测超时后,重新启动vpn,不重新读取keys,保留第一次使用的keys
persist-tun #通过keepalive检测超时后,重新启动vpn,一直保持tun或tap设备是linkup的,否则网络连接会先linkdown然后linkup
status openvpn-status.log #输出短日志,每分钟刷新一次,以显示当前的客户端
verb 3 #日志记录级别
push "route 10.1.15.0 255.255.255.0" # 为客户端创建对应的路由,以另其通达openvpn服务器内部网络服务器
client-to-client #客户端之间可以互通
log-append /var/log/openvpn.log #openvpn重启后会删除log内容,log-append则是追加log内容,并不删除。
log /var/log/openvpn.log #缺省日志记录位置文件
/usr/local/openvpn-2.0.9/sbin/openvpn /etc/openvpn/server.conf & #启动openvpn服务
[1] 31865
[root@localhost openvpn-2.0.9]# lsof -i :52116 #检查端口是否启动
COMMAND PID USER FD TYPE DEVICE SIZE NODE NAME
openvpn 31865 root 5u IPv4 288488 TCP 124.42.97.29:52116 (LISTEN)
[root@localhost openvpn-2.0.9]# vi /etc/rc.local #添加开机自启动
/usr/local/openvpn-2.0.9/sbin/openvpn /etc/openvpn/server.conf &
三、 客户端的操作
首先是window7客户端:
1.http://openvpn.ustc.edu.cn/openvpn-install-2.3.6-I603-x86_64.exe #下载gui软件并安装
2.将ca证书,客户端证书从服务器端拷贝到安装目录下的config目录下,并修改client.ovpn文件。

下面是client.ovpn的配置
client
dev tun #隧道模式
proto tcp #协议跟服务端一致
remote 124.42.67.29 52116 #服务端的IP地址和端口,如果有多台服务端做负载均衡,则可以出现多个remote
resolv-retry infinite #始终重新解析Server的IP地址,如果remote后面跟的是域名,保证Server IP地址是动#态的使用DDNS动态更新DNS后,Client在自动重新连接时重新解析Server的IP地址,这#样无需人为重新启动,即可重新接入VPN
nobind #在本机不绑定任何端口监听进入的数据
persist-key
persist-tun
ca ca.crt
cert csp.crt
key csp.key
comp-lzo
verb 3
3. 右击
图标以管理员身份运行,不然第一次直接双击启动的话会报下面的错:”error creating HKLM\SOFTWARE\OpenVPN-GUI key”
4. 查看程序图标颜色是否连通,绿色表示连通了,因为前面没有设置密码所以这是无密码交互连接


但是现在ping内网的那些服务器还是ping不通的:

这里是linux系统客户端的操作:
yum install openvpn -y
cd /etc/openvpn/ #将windows下面的config目录下面的证书和配置文件上传一份

openvpn /etc/openvpn/client.ovpn #这是启动命令
四、 Openvpn服务器端添加防火墙转发
1. 开启内核转发
[root@localhost ~]# cat /etc/sysctl.conf |grep forward
# Controls IP packet forwarding
net.ipv4.ip_forward = 1 #由默认的0变成1,开启转发功能
[root@localhost ~]# sysctl -p /etc/sysctl.conf #使其更改生效
2. 配置防火墙
[root@localhost ~]# iptables -t nat -F #清空nat表的规则
[root@localhost ~]# iptables -F #清空防火墙规则当然如果防火墙早做了其他设置就不能清空了
[root@localhost ~]# /etc/init.d/iptables save #保存到防火墙配置文件里面
Saving firewall rules to /etc/sysconfig/iptables: [ OK ]
[root@localhost ~]# service iptables restart #重启防火墙开始配置
Flushing firewall rules: [ OK ]
Setting chains to policy ACCEPT: nat filter [ OK ]
Unloading iptables modules: [ OK ]
Applying iptables firewall rules: [ OK ]
[root@localhost ~]# iptables -A INPUT -p tcp --dport 52116 -j ACCEPT #允许访问52116端口的tcp请求通过
[root@localhost ~]# iptables -A INPUT -m state --state ESTABLISHED,RELATED -j ACCEPT #制定状态,指定连通状态和关联状态的请求通过
[root@localhost ~]# iptables -t nat -A POSTROUTING -o eth0 -s 10.16.0.0/24 -j SNAT --to-source 10.1.15.105 #指定来自10.16.0.0网段的请求都转换成10.1.15.105.这个eth0是机器内网地址的网卡,因为要跟内网地址通信嘛。
如果防火墙没有限制端口和IP访问的,其实只要最后一步转发就行了。
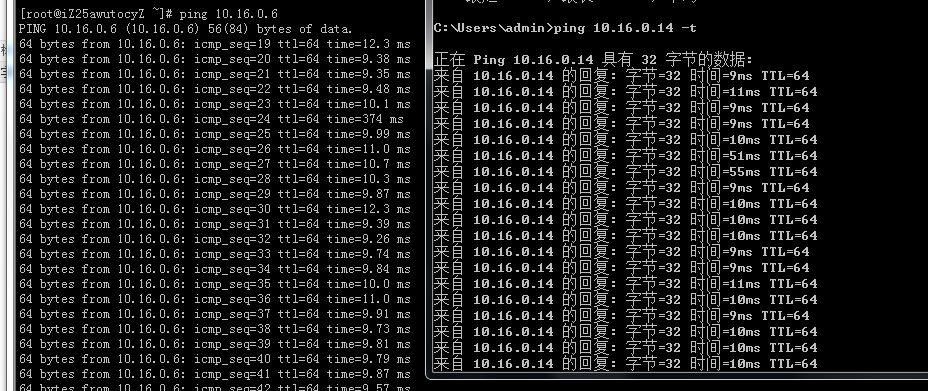
然后我们再ping办公网络内网的ip,结果是通的

下面是我两台客户机互ping的结果,左边为阿里云主机右边为我的本地电脑
下面是我云主机通过openvpn跳到我办公内部网络机器的截图:
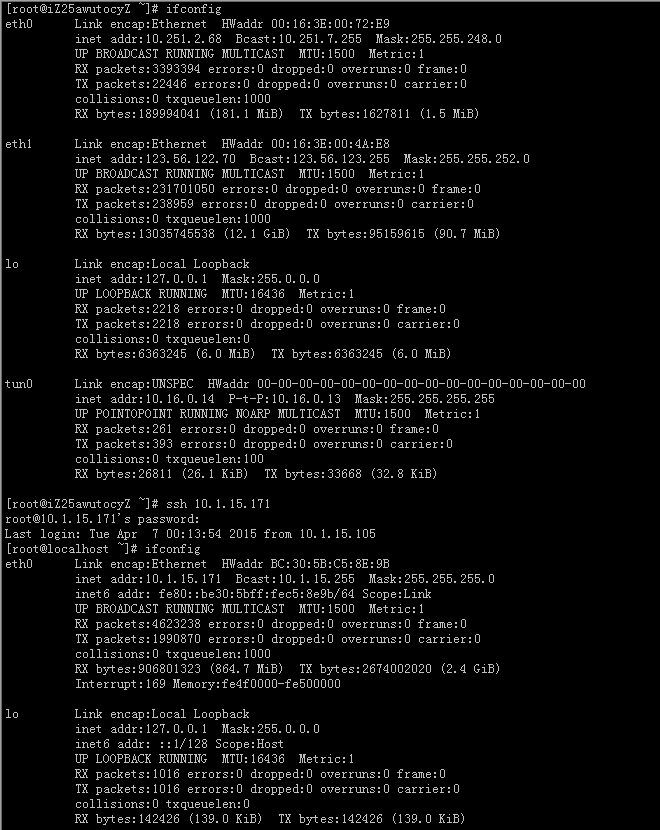
以后在家只要有权限就可以在家跳到办公网做我们想做的事情了,当然也可以跳到服务器上面去操作。
后期维护
如果后期重新添加key的话
# source vars
#./build-key
后期客户端的吊销
# source vars
#./revoke-full csp #-->会生成crl.pem文件
检查keys/index.txt,发现被吊销的用户前面有个R
怎么使吊销的生效呢,就是在server.conf里面加上 #crl-verify /etc/openvpn/keys/crl.pem,然后重启openvpn服务生效。
补充一点,每个人尽量生成一个客户端证书秘钥,这样就可以根据用户名和ip干很多事情,比如说限制权限啊,因为证书不一样,所获得的ip地址就不同,这样对我们的管理是很方便的。
至此一个简单的openvpn就搭建完成了,我们客户端也可以在没有公网地址的情况下互访了,后续还会对openvpn的认证方式啊,负载啊等进行编写博文
报错汇总:
配置没问题,但是用windows机器连接的时候会提示连接失败!
错误截图:

客户端日志信息:
Fri Dec 02 16:32:17 2016 do_ifconfig, tt->ipv6=0, tt->did_ifconfig_ipv6_setup=0
Fri Dec 02 16:32:17 2016 MANAGEMENT: >STATE:1480667537,ASSIGN_IP,,10.16.0.6,
Fri Dec 02 16:32:17 2016 open_tun, tt->ipv6=0
Fri Dec 02 16:32:17 2016 CreateFile failed on TAP device: \\.\Global\{A7FFF8D6-ABF6-4CFC-ABD2-B41AE749CC5F}.tap
Fri Dec 02 16:32:17 2016 MANAGEMENT: Client disconnected
Fri Dec 02 16:32:17 2016 All TAP-Windows adapters on this system are currently in use.
Fri Dec 02 16:32:17 2016 Exiting due to fatal error
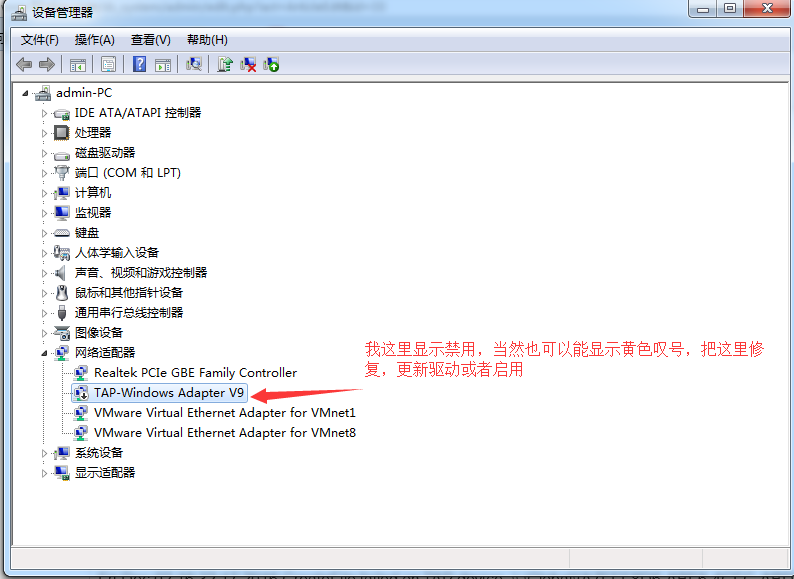
问题解决:
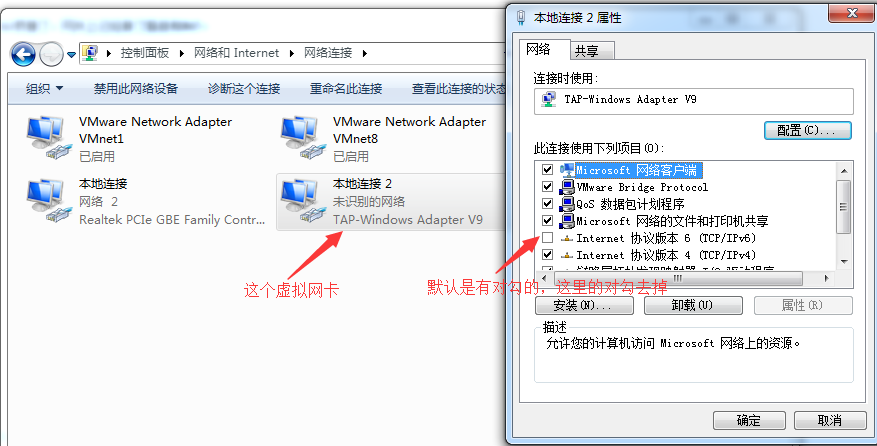
那么就要看TAP虚拟网卡,看是否有问题!
2. 日志狂刷lzo日志
日志信息:
Fri Dec 2 17:10:50 2016 test1/192.168.1.145:62762 Bad LZO decompression header byte: 96
Fri Dec 2 17:10:50 2016 test1/192.168.1.145:62762 Bad LZO decompression header byte: 96
Fri Dec 2 17:10:50 2016 test1/192.168.1.145:62762 Bad LZO decompression header byte: 96
Fri Dec 2 17:10:50 2016 test1/192.168.1.145:62762 Bad LZO decompression header byte: 96
Fri Dec 2 17:10:50 2016 test1/192.168.1.145:62762 Bad LZO decompression header byte: 96
Fri Dec 2 17:10:50 2016 test1/192.168.1.145:62762 Bad LZO decompression header byte: 96
Fri Dec 2 17:10:50 2016 test1/192.168.1.145:62762 Bad LZO decompression header byte: 96
Fri Dec 2 17:10:50 2016 test1/192.168.1.145:62762 Bad LZO decompression header byte: 96
Fri Dec 2 17:10:50 2016 test1/192.168.1.145:62762 Bad LZO decompression header byte: 96
解决方法:
comp-lzo #客户端与服务器端要保持一致,如果服务器端开启了压缩功能,客户端配置文件里面也要加上此条命令。
3. 日志狂刷mroute_extract_addr_from_packet日志
日志信息:
Fri Dec 2 17:16:41 2016 test2/192.168.1.145:62975 Need IPv6 code in mroute_extract_addr_from_packet
Fri Dec 2 17:16:41 2016 test2/192.168.1.145:62975 Need IPv6 code in mroute_extract_addr_from_packet
Fri Dec 2 17:16:41 2016 test2/192.168.1.145:62975 Need IPv6 code in mroute_extract_addr_from_packet
Fri Dec 2 17:16:41 2016 test2/192.168.1.145:62975 Need IPv6 code in mroute_extract_addr_from_packet
Fri Dec 2 17:16:41 2016 test2/192.168.1.145:62975 Need IPv6 code in mroute_extract_addr_from_packet
Fri Dec 2 17:16:41 2016 test2/192.168.1.145:62975 Need IPv6 code in mroute_extract_addr_from_packet
Fri Dec 2 17:16:41 2016 test2/192.168.1.145:62975 Need IPv6 code in mroute_extract_addr_from_packet
解决办法:
在控制面板的网络和共享中心打开openvpn使用的TAP-win32网卡,选择属性,去掉IPV6前的对勾即可。
