Centos 6.4 Cobbler使用详解(二)
前面http://www.51niux.com/?id=53 一章已经讲了cobbler的简单部署,这里对cobbler进行下补充。
一、 Cobbler的命令详解
[root@localhost dhcp]# cobbler #可以查看cobbler的命令选项
usage
=====
cobbler <distro|profile|system|repo|image|mgmtclass|package|file> ...
[add|edit|copy|getks*|list|remove|rename|report] [options|--help]
cobbler <aclsetup|buildiso|import|list|replicate|report|reposync|sync|validateks|version|signature|get-loaders|hardlink> [options|--help]
上面为cobbler的命令格式
查看帮助举例:
[root@localhost ~]# cobbler profile --help
usage
=====
cobbler profile add
cobbler profile copy
cobbler profile dumpvars
cobbler profile edit
cobbler profile find
cobbler profile getks
cobbler profile list
cobbler profile remove
cobbler profile rename
cobbler profile report
[root@localhost ~]# cobbler profile edit --help
Usage: cobbler [options]
Options:
-h, --help show this help message and exit
--name=NAME Name (Ex: F10-i386-webserver)
--uid=UID
--owners=OWNERS Owners (Owners list for authz_ownership (space
delimited))
--distro=DISTRO Distribution (Parent distribution)
--parent=PARENT Parent Profile
--enable-gpxe=ENABLE_GPXE
Enable gPXE? (Use gPXE instead of PXELINUX for
advanced booting options)
--enable-menu=ENABLE_MENU
Enable PXE Menu? (Show this profile in the PXE menu?)
--kickstart=KICKSTART
Kickstart (Path to kickstart template)
--kopts=KERNEL_OPTIONS
Kernel Options (Ex: selinux=permissive)
[root@localhost ~]# cobbler import --help
Usage: cobbler [options]
Options:
-h, --help show this help message and exit
--arch=ARCH OS architecture being imported
--breed=BREED the breed being imported
--os-version=OS_VERSION
the version being imported
--path=PATH local path or rsync location
--name=NAME name, ex 'RHEL-5'
--available-as=AVAILABLE_AS
tree is here, don't mirror
--kickstart=KICKSTART_FILE
assign this kickstart file
--rsync-flags=RSYNC_FLAGS
pass additional flags to rsync
博文来自:www.51niux.com
我们现在主要用cobbler来进行系统安装,如果用到特殊的需求可以根据--help来查看详细的用法
cobbler常用到的命令:
cobbler check #检查cobbler配置
cobbler sync #同步配置到dhcp/pxe和数据目录
cobbler list #列出所有的cobbler元素
cobbler import #导入安装的系统镜像
cobbler report #列出各元素的详细信息
cobbler distro #查看导入的发行版系统信息
cobbler profile #查看配置信息
cobbler system #查看添加的系统信息
cobbler reposync #同步yum仓库到本地
二、安装系统后网卡名称改变
Centos7有的时候通过网络安装完系统之后呢网卡名称会发生变化,如:eno16777736
这是因为Centos7改了新的网卡规则:
从CentOS/RHEL7起,可预见的命名规则变成了默认。这一规则,接口名称被自动基于固件,拓扑结构和位置信息来确定。现在,即使添加或移除网络设备,接口名称仍然保持固定,而无需重新枚举,和坏掉的硬件可以无缝替换。
网卡名称看着还是不习惯,所以要修改一下,下图为网卡名称:

解决方法:
# vi /etc/sysconfig/grub
然后,往这个文件中添加“net.ifnames=0 biosdevname=0”内容,禁用该可预测命名规则,如下图所示:

# grub2-mkconfig -o /boot/grub2/grub.cfg #重新生成GRUB配置并更新内核参数
# cd /etc/sysconfig/network-scripts/ #因为文件已经生成,所以要将网卡文件调整过来
# mv ifcfg-eno16777736 ifcfg-eth0
# sed -i "s#NAME=.*#NAME=eth0#" /etc/sysconfig/network-scripts/ifcfg-eth0
# sed -i "s#DEVICE=.*#NAME=eth0#" /etc/sysconfig/network-scripts/ifcfg-eth0
#reboot #重启服务器,看下图,网卡就改变回来了(有的服务器就不用这样设置,默认网卡命名还是跟原来的一致)。

当然还有另外的解决办法:

上图可以看到我们以前习惯的/etc/udev/rules.d/70-persistent-net.rules文件没有了。如果想以后可以跟系统一样可以写一个/lib/udev/write_net_rules类似的检测脚本,或者如果后续没有网卡变更操作,我们可以手写一个70-persistent-net.rules文件。

重启服务器ip addr 可以看到网卡模式已经发生了改变,但是网卡文件已经生成,还是要像上面一样修改网卡文件的。
博文来自:www.51niux.com
三、boot安装系统
如果在机房安装,dhcp可以通过绑定mac的形式来指定只给哪台服务器返回ip请求,但是如果台数少又不想去修改dhcp服务器或者开启dhcp服务器,可以通过插入光盘然后通过boot界面手工指定的形式来安装操作系统。
这里就要注意了,如果你要安装Centos 7系列的系统就要用Centos7的光盘去引导,不要用Centos 6系列的光盘去引导,我估摸着这里没有仔细考究,你还有一些pxelinux.0,vmlinuz之类的文件需要本地加载的。
所以这时候你要通过boot方式来安装操作系统,就要安装对应的系统光盘,不然你会发现安装界面是Centos 6系列的,安装完之后,系统不能启用。
怎么用boot方式来直接调用http的url来安装呢?
第一步:插入光盘选择光盘启动,等到了安装系统界面按esc便可到了boot安装界面
第二步:在boot界面输入:linux(安装linux操作系统) text(文本界面安装) ip=本机的ip gateway=网关地址 netmask=子网掩码 nameserver=dns的服务器 ks=url连接地址(去/var/lib/tftpboot/pxelinux.cfg/default这里查看,当然如果嫌链接太长的话自行修改)

第三步:按回车,查看信息,如果有问题会提示的。
注:啰嗦一句,如果实体机房是服务器上面插的是光钎,如果老是faid to cobbler服务器,可尝试光口上面单接一根网线来安装试试,不然的话就要去bios里面去设置。这里还是要根据服务器型号的不同来灵活掌握的。
四、cobbler-web搭建与使用
Cobbler web界面是一个很好的前端,非常容易管理很多Cobbler操作。可以用它列出和编辑distros, profiles, subprofiles, systems, repos and kickstart文件。
cobbler_web支持多种认证方式,如authn_configfile、authn_ldap或authn_pam等,默认为authn_denyall,即拒绝所有用户登陆。下面说明两种能认证用户登录cobbler_web的方式
1.使用authn_pam模块认证cobbler_web用户
首先修改modules中的[authentication]段中的module参数的值为authn_pam,接着设定系统用户,并为用户设定密码,而后将设定的系统用户添加至cobbler_web的admin组中,修改/etc/cobbler/users.conf文件,将设定的用户添加为admin参数的值即可。
2.使用authn_configfile模块认证cobbler_web用户
首先修改modules中的[authentication]段中的module参数的值为authn_configfile,接着创建其认证文件/etc/cobbler/users.digest,并添加所需要的用户即可。需要注意的是,添加第一用户时,需要为htdigest命令使用“-c”选项,后续添加其他用户则不能再使用。
我们这里使用的是密码文件认证的形式。
# yum install Django cobbler-web -y #下载需要软件
# htdigest /etc/cobbler/users.digest "Cobbler" chaishao #创一个一个新的用户叫做chaishao
Adding user chaishao in realm Cobbler
New password: #输入两次密码,我的密码为123456
Re-type new password:
# cat /etc/cobbler/users.digest #查看文件除了之前创建的cobbler用户,还创建了一个chaihsao用户
cobbler:Cobbler:f8acd41b9f56390213d766487911ad84
chaishao:Cobbler:b1515ce410b437ce2df335cb7a6e01a8
# /etc/init.d/httpd restart #要重启服务,不然web界面出不来
# /etc/init.d/cobblerd restart
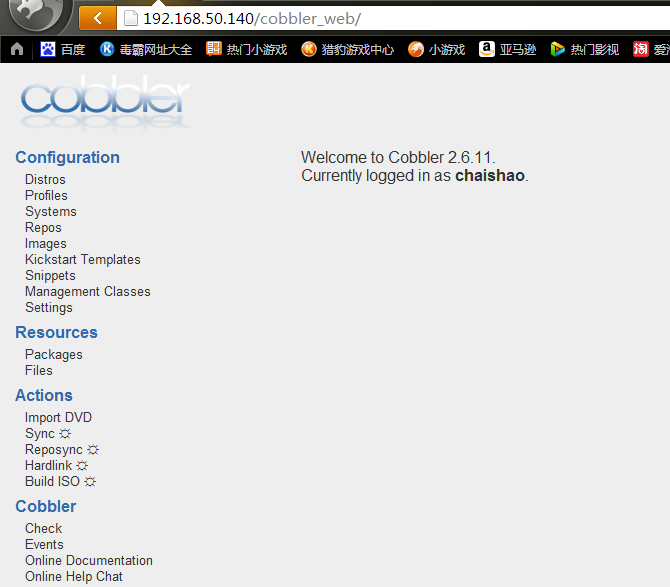
在浏览器上面输入我们cobb;er服务器的IP/cobbler_web,如我的URL为:http://192.168.50.140/cobbler_web

